| |
Towers of Hanoi Usage
Description: This tutorial covers how to run the Towers of Hanoi puzzleTutorial Level: ADVANCED
Things you need
- PR2
- Towers of Hanoi game board (including the three discs)
- A computer or portable device that can display a web page

System Overview
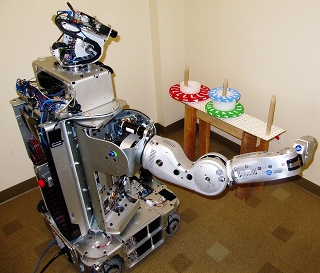
This package is designed to allow a person to control the PR2 through a simple version of the Towers of Hanoi puzzle. The person controlls the PR2 by sending it a series of commands from the GUI. This GUI allows the person to select an action and object pair, and pass it to the robot as a commands.
The available actions include: Move-to, Pick-up, Put-down.
The available objects include: Red Disk, Blue Disk, Green Disk, Left Pole, Middle Pole, Right Pole
A valid command could be: Move-to the Blue Disk
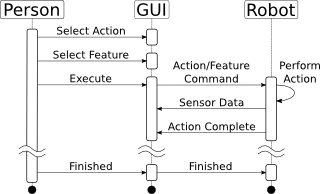
The webserver, which is included in this package, relays the desired command from the gui on to ROS. Data from the robot is also communicated back to the GUI via the webserver.
A system collaboration diagram is shown below.

The GUI
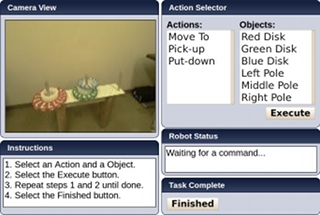
The GUI was designed to operate on a handheld device, but it can also be run on a desktop.
There are five gadgets in the GUI. Starting with top right widget and moving clockwise, the GUI contains an Action Selector widget that allows an teacher to control the robot. Inside this widget are two text lists. The list on the left, labeled Actions, contains all the available actions. These actions are movements that the robot can perform without any additional guidance from the teacher. To the right of this list is the Objects list. These list entries are all the entities in the environment that the robot can detect and interact with. Again, object recognition software has been provided to the robot without additional instruction from the teacher.
Below the Action Selector widget is the Robot Status widget. Inside this widget are displayed status messages from the robot. This includes messages pertaining to the progress the robot is making toward completing a given command, and error messages.
The next widget is titled Task Complete, and contains a single button. This widget exists to provide a mechanism that indicates when a demonstration is complete.
Moving clockwise, the Instructions widget displays a concise list of instructions for the teacher.
The final widget located in the upper left is the Camera View. The image displayed in this widget is a video stream from robot's camera.

Calibration and Setup
Color Calibration
The PR2 uses the cmvision package to detect the colored disks. This package is a color blob detector, and needs to be calibrated to the current lighting conditions.
On the robot,
roscd pr2_alpha
roslaunch prX.launch
Also on the robot, start perception
roscd hanoi
roslaunch launch/perception.launch
On your desktop PC,
rosrun cmvision colorgui image:=/wide_stereo/left/image_rect_color
A window will appear that displays the current image view. Each color (red, green, and blue) needs to be calibrated. Start with red by clicking on various red points on the disk. After about three - four clicks you should start to see boxes appear. These boxes outline the regions that cmvision thinks are red. Continue clicking until you have a nice big box around a majority of the red disk.
Once you are done with the color red, you'll need to save some information into a color file. A color file is used by cmvision to determine which colors to detect. In our case the color file is located in the hanoi package, and it's called colors.txt. Take a look at it now:
cat `rospack find hanoi`/colors.txt
It should look something similar to this:
[Colors]
(255,  0,  0) 0.000000 10 Red
(  0, 255,  0) 0.000000 10 Green
(  0,  0, 255) 0.000000 10 Blue

[Thresholds]
( 37:138, 96:115, 146:172 )
( 40:151, 100:115, 116:126 )
( 79:141, 114:126, 119:127 )
You should only change values in the [Thresholds] section. Each line in this section corresponds to a line in the [Colors] section. The first line in [Thresholds] matches the first line in [Colors], and so on.
Let's look at a single line in the [Thresholds] section.
( 37:138, 96:115, 146:172 )
Each comma separated value is a range in the YUV color space. The first range, 37:138, is the low and high values for Y. The 96:115 is for U, and 146:172 is for V. Since this is the first line in the [Threshold] section, it applies to the first color in the [Colors] section. In this case, it applies to the color red.
Now, look at the colorgui and notice the YUV text boxes in the lower left part of the application. These are the range values for the color red, which you have just selected. Copy these values into the colors.txt file in the hanoi package.
Once you are done, press the Reset button and repeat the process for green and blue. These values should remain valid as long as the lighting condition don't change too much.
Positioning the Robot
The towers of hanoi puzzle should be aligned such that the PR2 squarely faces the board, and the middle pole is roughly aligned with the left shoulder joint. Place the board about 2.5 feet from the robot, and make sure that the robot can easily reach all three poles.
Each time you run the program, make sure that the green and blue disks are on the middle pole and the red disk is on the left pole.
Running the Code
On the Robot
The following commands should be run on the robot.
1. Bring up the robot
  roscd pr2_alpha
  roslaunch prX.launch
Wait until the launch finishes before continuing.
2. Start Perception Node
  roscd hanoi
  roslaunch launch/perception.launch
Wait until the launch finishes before continuing.
3. Start Action Node
  roscd hanoi
  roslaunch launch/action.launch
Wait until the launch finishes before continuing.
4. Start Planning Node
  roscd hanoi
  roslaunch launch/planning.launch
5. Start Web Server
  roscd hanoi
  ./scripts/server.py
6. Start the Arm Planner
  roscd hanoi
  roslaunch launch/arm.launch
Wait for this script to finish before continuing.
7. Start the Hanoi Node
- Make sure the green and blue disks are on the middle pole, and the red disk is on the left pole.
  roscd hanoi
  roslaunch launch/hanoi.launch
Connecting to the web server
First create a public_html directory in your home folder
cd
mkdir public_html
Next create a symlink in the public_html folder to the webgadgets in the hanoi package
cd public_html
ln -s `rospack find hanoi`/webgadgets hanoi
Point a web browser to
http://pr<X>2.willowgarage.com/~<username>/hanoi
And you should see the GUI.
At this point you should be all set. Enjoy playing Towers of Hanoi.


